|
For many years, visitors to the Australian War Memorial in Canberra have been able to see a picture of Australian Army signallers, including Sapper Henry (Harry) Dadswell (1894-1978), in action on the Western Front during one of World War One's more ferocious battles.
The same picture was also included in a special 2007 exhibition at the Memorial to mark the 90th anniversary of the battles of 1917.
Not a lot of information was officially recorded about the circumstances shown in the picture, but research has now given names to all the signallers in the picture, and something about the dramatic activities that the picture records.
Toz Dadswell, son of Henry Dadswell, recognised his father when he first saw the picture in the War Memorial's Western Front Gallery way back in the 1970s.
He sent a copy to his father who could recall the photograph being taken, and he provided some information about what was happening when the photographer arrived. And when the opportunity arose in the 1990s, Toz sought out war diaries and other documents to build up a better understanding about the tense circumstances shown in the picture.
Background information
In late September 1917, a desperate attempt was being made to push German troops back from their line in western France and Belgium. The battle of Polygon Wood was one of a number which took place in Flanders in 1917 and it followed the British success at Menin Road near Ypres, Belgium.
The aim of the offensive of this time was to capture Passchendaele, with Menin Road and Polygon Wood to be stepping-stones to the ultimate objective. However, the final battle for Passchendaele was to become one of the greatest disasters of the war for the Allies.
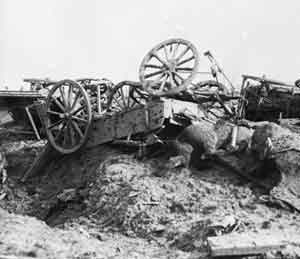
The signallers photograph was taken in Westhoek Woods (to help visualise the 'woods', the picture at the right was taken by Captain Frank Hurley and shows a not untypical scene during fighting in the area. Click here to see a larger image).
The location of the signallers photograph was a German pillbox which had been captured during the battle of Menin Road. The Australian Army's 5th Division signallers had set up their headquarters there with telephone lines running from the pillbox back to Brigade headquarters.
The Germans were well aware that the Allies were going to attack across the Wood and on 25 September 1917 subjected the Australians to a prolonged, heavy bombardment. There were many casualties.
On the next morning, the infantry went 'over the top,' covered by artillery support. However the Germans continued their bombardment, and it was a killing field.
Sgt Jim Moore's signal section was charged with keeping open the telephone lines, so that Brigade headquarters would know progress and be able to direct artillery support to where it was most needed.
Moore and his team had repeatedly run telephone lines across the exposed battle field, but the shelling was so intense these were soon cut. So little, if any, information was reaching the Brigade headquarters.
As a result, Sgt Alf Sheppeard was directed later that day (September 26) to take his signal section to the front and "sort things out."
But just prior to Sheppeard arriving, a shell had landed in the trench near the pillbox, killing some of Moore's men. According to Henry Dadswell (part of the Sheppeard team), the Moore team was still dealing with the remains of their dead when the relieving team arrived.
Sheppeard told Moore to take his section and leave, as the new arrivals were to "sort things out." Again according to Henry, Sgt Moore was very upset (and in Henry's view, rightly so). He and his men had done everything possible to keep the lines open but the shelling had been too heavy for them to succeed. And four of his men had just lost their lives.
The photograph
In the midst of this turmoil, enter a photographer whose name remains unknown.
Sheppeard apparently told Moore that he personally would run the line but Moore took this as questioning his ability and dedication, and said: "If you run the line I will go with you". Sheppeard agreed.
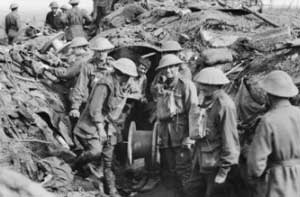
So the photograph shows the unusual situation of two sergeants at the top of the trench about to start their run. It looks like the men are posing for the photographer - but that is far from the reality.
As they went over the top of the trench, a large shell landed in front of them. At the moment of the photograph, the two sergeants are frozen, waiting to see if the shell explodes. If it does, they are both dead. It didn't.
Those in the picture: Standing in the dugout entrance, from left - Sapper H. W. Dadswell, Sapper C. J. S. Wells, Sapper K. Parnell. At the top of the trench - Sgt A. E. Sheppeard and Sgt J. Moore (for a larger image, click here).
The aftermath
The sergeants ran the line, but as before it was cut in many places. So Sheppeard and his team were forced to run across the open battle ground with notepads to get information from the infantry and then run back to the pillbox and transmit it to the Brigade headquarters.
As the Germans retreated, the shelling became less intense and the signallers could run lines across open ground and keep them open. During this time, Henry Dadswell and one of his closest signaller mates, Sapper Arthur Weir, looked after a line while under small arms fire for more than 90 hours and it was out of action for only a short time.
Both, along with others, were awarded the Military Medal for their part in the campaign.
The research
It is quite extraordinary that the circumstances surrounding this picture have come to light some 90 years after the event.
At the time of his detailed research, Toz Dadswell had retired from the Royal Australian Navy and had become a volunteer guide at the Australian War Memorial in Canberra.
His 'tour circuit' often included conducting visitors through the Memorial's Western Front Gallery where this picture was on display, and it became a quest to find more information about the circumstances of this picture.
He had some information from his father Henry, but by this time his father had died and Toz turned elsewhere for information.
Sgt Alf Sheppeard and Henry Dadswell had stayed in occasional contact following the war and amongst Henry's papers was a letter from Sgt Sheppeard's son Ken, telling Henry that his father had died.
The letter came from an address in South Johnstone in Queensland and a search of telephone directories showed one entry with this distinctive surname close to this location. Toz wrote in the hope it might lead to contact and - a very long shot - perhaps some information.
A response came from Ken and it included the good news that his father had written a detailed war diary. And not only was the photograph displayed in the diary but it also identified all the signallers involved.
In his diary, Sgt Sheppeard had also written:
This photo was published in two London papers under the title 'Signallers laying out telephone lines under heavy shell fire during the Battle of Zonnebeke'. It was republished in two Sydney papers. Moore and self are bending to a bursting shell, Dadswell is standing at the entrance to GW [probably 'Glencorse Woods station']. The four men killed in the morning were standing just behind Wells. Parnell was wounded a few minutes after the photo was taken. Note the telephone lines running along the trench, these go to the 15th Brigade positions. Dadswell and Moore both received the Military Medal. I got a mention in dispatches for this work.
His diary continues:
There then followed the unusual spectacle of two sergeants running through Glencorse Wood, letting out a cable from a drum. Moore had arranged for Parnell (one of his men) to follow us and clear the line of obstacles. Arriving at point NB [Nonne Bosschen] we found one of my men, Dadswell, behind us. Parnell had been hit in the head leaving the trench. Dadswell immediately took his place.
In his diary of these days, Henry Dadswell had written:
One remembers Polygon Wood stunt as one long nightmare, than a clear cut memory. Those barrages were the heaviest I've ever encountered. One was almost afraid to go amongst the battalions asking for mates as so many had died or been wounded.
Also:
Glencorse Wood was a very bad spot and the dead were thicker there than any other place I had seen.
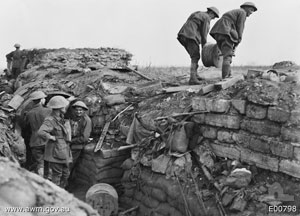
A second picture taken in the same location is also held in the War Memorial collection - it shows linesmen of the 5th Divisional Signal Company of Australian Engineers preparing to lay a telephone line from their signal office and observation post on Westhoek Ridge to a unit in the front line.
To see a larger image, click here.
Final word
It is difficult today to imagine the conditions of those dark days of 90 years ago. But the signallers in the picture, and others of their ilk, were without doubt a special breed. Of the five in the picture, all were awarded the Military Medal (MM) for exceptional bravery and dedication.
The MM citation for Henry Dadswell read, in part:
The (telephone) line ran across the most heavily shelled part of the area and the fact that we were only out of communication ... for about three hours in the last ninety six ... speaks volumes for his willingness and untiring efforts.
- Information compiled in January 2008
* See:
Henry Dadswell — The Quiet Times between WW1 Battles
Diary of a Sapper — World War One Reflections of Sapper Henry W Dadswell
World War One Crisis for Dadswell Soldier
Generation 9, Henry William Dadswell
Return to Family Stories Index Page
|